
Yearbook photography is more than just snapping pictures…it's about capturing the spirit of the school, one moment at a time. Whether you're covering sports events, club meetings, or hallway laughs, your photos help tell the story of your school community.
TYPES OF CAMERAS
You don't need fancy gear, but it helps to know what's out there:
DSLR (Digital Single-Lens Reflex): These cameras offer excellent image quality and full control over settings like focus, exposure, and shutter speed. They’re great for action shots and low-light situations, but they can be bulky and expensive.
Point & Shoot: Compact and easy to use, these cameras are perfect for beginners. They don’t offer as much control as DSLRs, but they’re lightweight and convenient for quick shots.
Smartphones: Today’s smartphones have powerful cameras that can take stunning photos. With the right techniques, your phone can be a reliable tool for yearbook photography, especially when you're on the go.
Not sure which type of camera is best for your school? Check out our handy guide HERE.
SMARTPHONE PHOTOGRAPHY TIPS
If you need to use your phone to take photos, here are a few things to remember to get the best results:
- Clean the lens: a quick wipe can make a big difference in clarity.
- Check your resolution settings: you'll want to make sure your phone is set to the highest resolution available. This will ensure your photos will look sharp in print and can be resized without losing quality.
- Use natural light: whenever possible, shoot in well-lit areas. Avoid using the flash unless absolutely necessary.
- Tap to focus: most phones let you tap the screen to focus on your subject. This helps keep your photos sharp.
- Hold steady: use both hands or rest your phone on a stable surface to avoid blurry image.
- Try different angles: don't just shoot from eye level…get low, go high, or move around to find a more interesting perspective (read more on Composition HERE).
- Avoid zooming in: Digital zoom can reduce image quality. Instead, move closer to your subject if you can.
LIGHTING TIPS
- As mentioned, use natural light wherever possible! Outdoor light, especially in the morning or late afternoon, is often the most flattering.
- Unless you're going for a silhouette, make sure your subject isn't standing directly in front of a bright light source, like a window.
- Be mindful of mixed lighting (e.g. fluorescent and daylight) which can affect colour balance.
Take a deeper dive into lighting HERE.
PHOTOGRAPHY TERMINOLOGY
- Exposure: The amount of light that reaches your camera’s sensor. Too much light = overexposed (too bright); too little = underexposed (too dark).
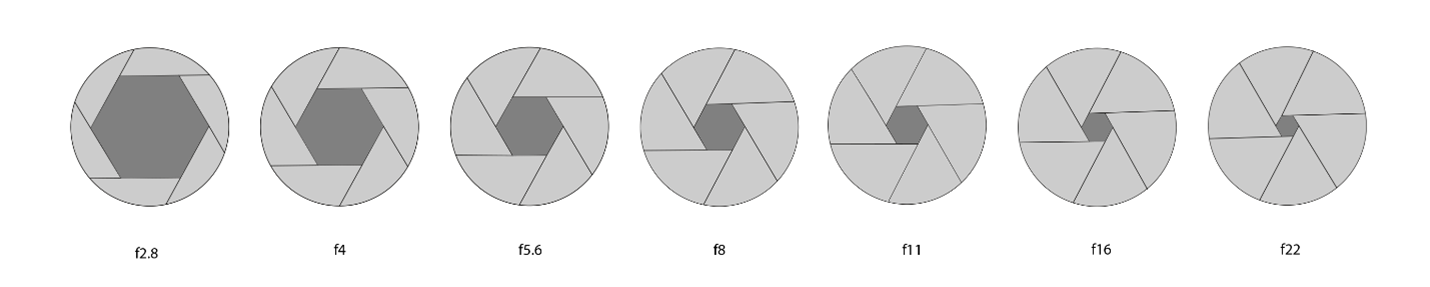
- Aperture: The opening in the lens that controls how much light enters. A lower f-number (like f/2.8) means more light and a blurrier background.
- Shutter Speed: How long the camera’s shutter stays open. Faster speeds freeze motion; slower speeds can create blur.
- ISO: Controls your camera’s sensitivity to light. Higher ISO helps in low light but can add grain to your photo.
- Composition: How elements are arranged in your photo. Using the “rule of thirds” (placing your subject off-centre) often makes for a more dynamic image.
- White Balance: Adjusts the colours in your photo to match the lighting conditions so whites look white, not yellow or blue.
- RAW: A file format that captures all the data from your camera’s sensor without compressing it. RAW images offer more flexibility when editing, especially for adjusting exposure, contrast, and colour, but they take up more space and usually require special software to process.
ESSENTIAL READING AT OUR BLOG
Why Image Resolution Matters
The Heart of Storytelling
DSLR or Mirrorless: Which Camera is Best?
